Alerts (Real Time)
In the Alerts tab, you can create specific rules based on events that occur in your collaboration environment. When triggered, vAnalytics will then send email notifications to selected users.
SUMMARY
When you enter this tab, the Alert Manager displays a list of all configured alerts. All saved alerts can be found here, including those configured by other users.
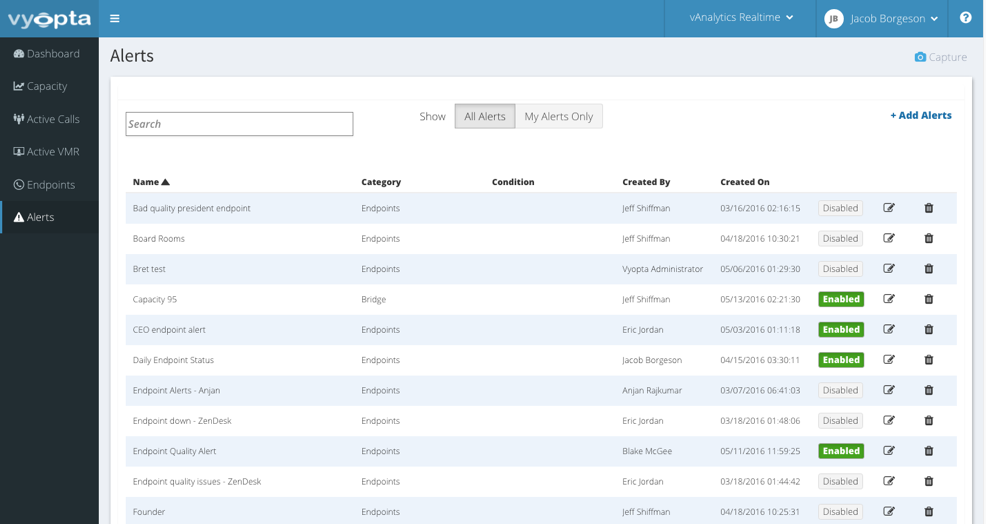
This table provides the following information for the listed alerts:
- Alert Name– Shows the custom name you created for your alert.
- Alert Category– Alert categories fall in three types:
- Endpoints– Device status and Call Quality (when Endpoint Monitor is installed)
- Call Control– status, call quality and capacity check
- Bridges– Status, Capacity, Media Load (Pexip), and Call Quality alert types
- Condition– Shows the test condition for the alert (i.e. Capacity over 50%)
- Created By– Shows the user that last modified the alert rule
- Created Date– Shows the last date the alert rule was modified
- Actions– There are three icons for the following actions:
- Edit(pencil) – Selecting this allows you to make changes to your alert rule, including disabling an active alert
- Delete (trashcan) – Selecting this allows you to delete or remove an alert rule
- Enable/Disable – The toggle switch allows you to easily turn an alert on or off without deleting it
ALERT CREATION
To create an alert rule, click “Add Alert” at the top right corner of the browser view, which brings up the alerts editor:
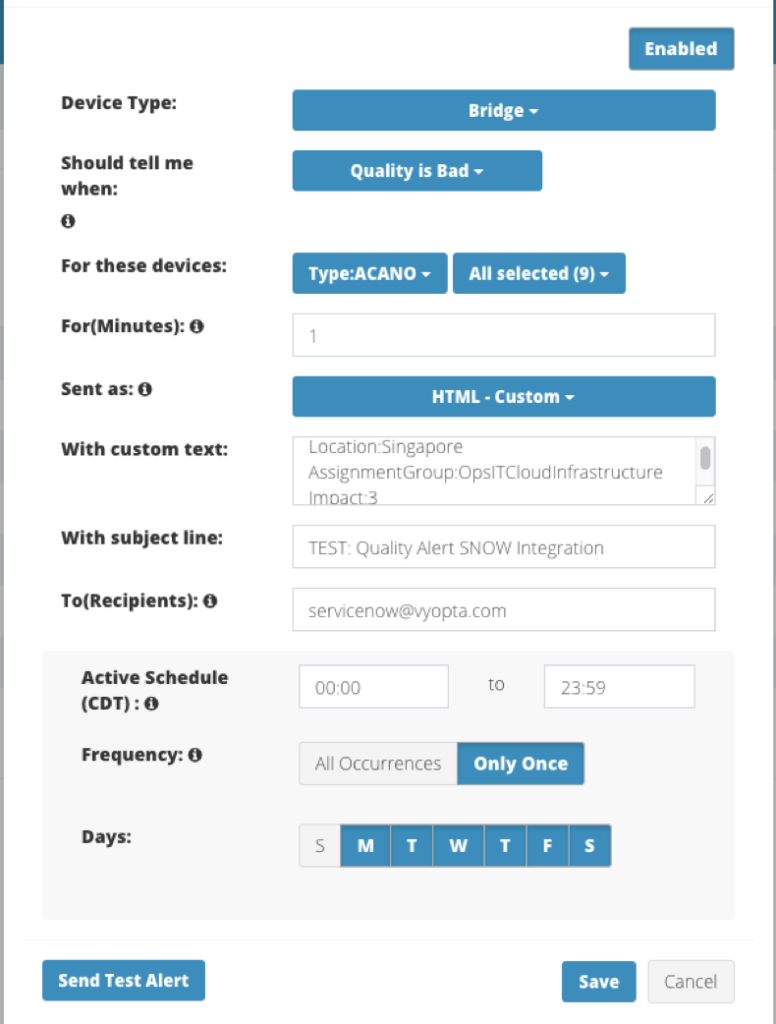
- Select Type: Choose Endpoints, Bridge, or Call Control to cover the desired component.
- Should Tell Me When: Choose Status is Down, License Capacity, Media Load, or Quality is Bad. Then choose the limit value for License or Media Load.
- Select Devices: Use the dropdown to select eligible technologies and then individual devices.
- Set Duration: The alert condition must be at or over (in the case of License or Media) the condition continuously for the set duration. If the device fails to meet or exceed the condition at any time, the alert counter is reset.
- Sent As: Select the email type. The HTML Custom type lets you enter custom text into the email body for integration with help desk software like Zendesk or ServiceNow.
- With Custom Text: When HTML Custom type is selected this field appears so you can enter your custom fields for the email body.
- With Subject Line: Create your own custom subject line: every email starts with “vAnalytics Real Time Alert” followed by the text you enter here.
- Email Recipients– Input the email addresses for persons that should receive the alerts. Separate each email with a comma.
- Active Schedule– Select the intervals that you want the alert rule to run. You can select the hours of the day as well as the days of the week.
- Frequency– This sets whether an alert fires every time it happens or only the first time until it goes back out of alert condition. For example, if you have an alert with a duration of 1 minute set to “All Occurrences,” a call which goes “bad” for 15 minutes, returns to good for a period, and then bad once again for 10 minutes will generate 15 emails during the initial period, followed by 10 more in the latter. On the other hand, this same sequence would generate only one email if the frequency of the alert is set to “Only Once.”
ALERT EDITING
To edit any of your alert rules, click the Edit (pencil) icon, make your changes and then select Save to finalize your edits.
ALERT DISABLING
To disable any of your alert rules, click the Edit (pencil) icon, then check the Disable box at the top of the edit pop up window to disable the alert rule. Note that the check box will only be visible if the alert rule is currently enabled.
ALERT DELETION
To delete any of your alert rules, click the Delete (trash can) icon and confirm that you want to delete the alert. Note that deleted alerts are permanently removed and are not recoverable.